Tuesday, October 20, 2020

Game Scene - Weekly Progress (Final Update)

 Game Scene - Weekly Progress

Final Post (Dec. 13)

Models and Textures: 

1. Tree 

Model and UV

Texture

2. Shrine 

Texture

3. Crystal, Circle Floor, Modular Floor Piece

Texture

4. Archway/Broken Archway

Texture

5. Rocks

Texture

6. Well & Glowing Circle Archway

Texture

7. Crystal Mound and Crystal Pillar/Support Beam

Model and UV

Model and UV

Texture

8. Statue 

Texture

9. Obelisk, Chest, Lights 

Texture

10. Crystal Centerpiece 

Texture

Particle Systems: 

1. Glowing Mist Particle 


2. Dust Particle 


The final day of this assignment is upon us. In total, I have textured 10 scenes or about 20 different objects. I also modeled two or three of those objects. For our Unity scene requirements, I worked on the two different types of particle systems that are required in our scene. 

The only problems I encountered in Maya were mistakes I made myself. These mistakes were pretty novice things such as forgetting to change the measurements from centimeters to meters or forgetting to UV before duplicating an object twenty plus times. I could easily solve this by scaling up the model by 100 or aligning and snapping the UVs together.  

Some of the problems I encountered are mostly revolved around Substance Painter. By problems, I mean that Substance Painter began to crash a lot within our final week of this project. This problem could be due to the lack of storage space on my "C:"- drive which is strange because the cache space and the installation for the Substance Painter program should be in my "D:" - drive. It could also be that my graphics card driver is out of date. Regardless the only solution I have for this issue is to save as often as I can and hope that Substance does not crash. Aside from that, I also had issues with using opacity and emissive sliders on the same layer. The solution for that was rather simple, I used two different layers, or rather the base texture would use opacity and I would add a paint layer and paint on emissive details. 

Overall, I felt this project went smoothly for me. However, we did push a lot of the Unity scene work on the last day. Unfortunately, Unity Collab only allows for three-person teams so the only help I could provide is working on a separate Unity project and giving advice and tech support. It was stressful to watch my team panic through the final hours but at least we got it done despite missing a few aspects. 

I learned that time management is important for large group projects like these and it's especially important to not cram work on the last day despite it seeming like the last element, it's actually the most important. But for my work, I feel very proud of my texturing and all the new tricks I learned. The UV tools such as the align and snap tools are god-send and the 3D gradient in Substance is really fun to play with. I'm glad the particles look pretty good and I hope for future projects these skills will come in handy. Until next time! 


Week 8 (Dec. 9)

The last week is upon us. And for this last week, I modeled and textured a crystal mound and pillar as well as transferring the circle arch model into the well scene so they can be on the same UV sheet. The crystal model wasn't too difficult, just a lot of duplication and moving the different polygon cylinders around so they seem to be in a gem/rock formation. The one thing I forgot to do is UV the main crystals first before duplicating them. But thanks to that I learned so UV tricks, including snapping UV and aligning them. Thus I could easily align the 20 crystal UV faces together in groups of pentagons, hexagons, and octagons. After I beveled them so they would have a smoother look instead of a sharper one. After that, I slanted the top faces so the crystal looked more like the reference photos. The crystal pillar was easily done after I finished the crystal mound. That is because I used the crystal mound as a base for the crystal pillar and then just stuck a large crystal into the center. Then I could duplicate the mound and use it as a top lid for the pillar. 

Reference

Reference

Crystal Mound

Crystal Pillar

After getting our lead's approval, I moved it to Substance Painter and used the previous crystal and pillar textures as a base. The nice thing about this is that textures can be used in-between models so they all have a similar feel and can blend into each other in our environment and scene. Of course, I also added details and layers as well as playing with the layers and colors to make each model differs from the other. 

Textured

After I worked on transferring the circle arch textures to be in the same scene as the well. Our modelers decided to combine the well and circle arch models to save space on a UV sheet thus I would need to re-add the textures of the circle arch. Thanks again to Substance Painter's "create smart-material" it's easy to move textures. However, the painted details did not get moved so smoothly and I had to add them again. For some reason, Substance Painter kept crashing as I did the textures. I had to constantly save because I was terrified it might crash again. I finished the well model textures thankfully. 

Reference

Well Textured

However as I was exporting the textures, I realized I made a mistake in mixing up specular with emissive. I had to go back and redo the emissive by swap it with the specular parts. But then the opacity stopped working! I'm now stuck at this problem where the opacity of my textures isn't working properly... 

Opacity stops working

Oh thank god, it works again


I didn't find any solutions online so I just tried to redo the textures and created a new shader instance. Apparently creating a new shader instance worked! For some reason, the one I used previously was "outdated" and I had to create a new shader and reselect the alpha-blending. I breathed a sigh of relief and quickly exported the textures before any other problems occur. 


I updated Substance Painter to the newest version so hopefully no more crashes. And just four or so more models to go! We'll have to pick it up to make it in time for Sunday... 

Obligatory photo of Trello

Week 7 (Dec. 2)

Since we're coming back from a break, it's been a bit slow. The only card I was assigned to and finished was texturing the circular archway. This archway is an alternate archway compared to last week's gradient archway. The circular archway has a gradient as well but there isn't a broken version like the other archway. This is because this archway is less prominent and leads to the final room. The reference I used is:


I tried my best to follow the reference as close as possible but it is a bit difficult due to the lack of a proper light source. From the looks of it, there is a dark to light gradient going up the sides of the arch. There are also inner pillars that seem to be transparent and emissive. The circle itself seems to have three layers: a non-emissive material outer layer, a detailed emissive inner layer, and a ring of light inside of that. However, the model only has two layers for the ring, thus the outer layer has the same gradient material as the sides and the inner layer has emissive details. Some problems I encountered during texturing has the stencil being dull. I had to copy the layer two or three times to make the emissive brighter. Hopefully, it translates well in Unity. 


My next textures should be the obelisk that Matthew recently finished and the statue model that Austin is currently working on. There should be two or so more models after that and then we'll be focusing on putting everything into Unity. The next week will be our final week, so until then! Also here's a picture of the Trello board:


Week 6 (Nov. 18)

Longer week means a longer update since last week was shorter. I finished the circular piece, the uplifted floor piece, and the crystal piece that was created by Austin. After that, I textured the rock wall assets that William did. Currently, I am working on the archway models made by Matthew. 

The floor and crystal pieces took a bit longer to finish due to UV issues. In particular, the uplifted floor piece's UVs were a bit small, making the alpha and height detail textures blurry in comparison to the other pieces. Austin went back into Maya to upscale the UVs. Once he uploaded the updated Maya files, I could easily add back the textures using Substance Painter's smart materials. Luckily the alpha scaled up with the UVs as well so I didn't have to repaint the alpha. I did redo the height details so they fit better on the new UVs. The crystal textures did not take too long to make. Though unfortunately, my original plan for the crystal textures flopped. As stated last week I wanted to use opacity shaders to make my crystals a bit transparent or opaque. I then could use specular shaders to make it look like materials inside the crystal is what causes it to glow. However, the transparent shaders are a bit intense. The lines of the model pieces intersecting are too obvious and even making the opacity levels slow makes the sides of the crystal seem almost invisible. Thus I gave up on that plan and played with cloud layers and metallic levels instead to make a shiny colorful crystal. 


My next assignment was the rock wall. I used a concrete base for the color but the default colors were too cold which Matthew pointed out. I changed the colors to be warmer with a soft shade of red-ish peach. For the crystal parts of the wall, I reused the crystal textures from the previous piece and added more details such as the hammered filter. 


What I am currently working on and finishing up is the Archway textures. I made them similar to the shrine textures I did a while back. This was important since a gradient generator was needed. Luckily Substance has a great gradient tool that was a lot easier to use than I thought. I adjusted the colors to make the black-blue top and bottom parts more of a navy blue and the interior arch is now a white-ish color. 

Reference

Finished Textures

The archway textures are the only card I have left in the in-progress list. After finishing the textures for this, the next models I might be working on are the statues or the glowing archway. But that's all I have for now, until next time! 


Week 5 (Nov. 8)

This update is for a shorter week since our next meet up is on a holiday. So far we fixed up the previous models and UVs. I mentioned last week that I was working on the circular piece. However, the UVs for that were not completed because there are several other models on the UV sheet. So I went back to the group and Austin added his crystal piece to the UV sheet and reorganized the UVs. Once I got the Maya file, I went in and did the ID and low-poly FBX exports for transferring them over to Substance. 

Circular Piece Reference

Uplifted Floor Piece Reference

With a fresh Substance file with the new FBXs and mesh maps, I first worked on the circular piece. Of course, I saved my progress from last week as a smart material so I can easily reuse them but also I tweaked the materials and added further details.

Circular Piece Texture and Layers

UVs

Once I finished up those textures, I did the uplifted floor piece next. The UVs for this piece was smaller since it doesn't need to be that detailed. I did my best to replicate the fancy pattern though the side details are a lot hard to do since the UV sheet is too small for those details to be visible. 

Uplifted Floor Piece Textures and Layers

UVs

The next thing and last piece from this group I need to work on is the crystal. I still need a Trello card and references for that from the team but once that's settled I'll start on it. What I do plan to do with the crystal piece is make it a little bit opaque and use specular to make it "glow". 

Finally, here is a progress shot of the Trello Board as of now.

Trello Progress

Week 4 (Nov. 4)

For this week, I finished up texturing the Shrine model. The textures for this model were split into 4-5 different parts. The upper part of the model (the roof and arch) are in a dark-blue marble material. I used a jade material as a base and added details and grunge maps so it matches the reference picture. The references I used for texturing the shrine's roof and arches are: 


The next step is the columns which have a gradient from the dark blue to white to a purple-ish color and finally a lighter green. I used a lot of 3D gradient generators to try and achieve a more seamless look. 


Lastly, the shrine interior which I textured in two areas. The outer ring which was a darker purple and the inner center piece which was brighter and more wavy. I couldn't get it exact so I put my own spin to it and tried to replicate the details through another method. I'm still pretty glad it turned out well despite me having troubles with the purple emissions. 


The Trello card I finished this week is "As a player, I would like the shrine model with a roof to be textured like the reference images.".  Currently I'm in-progress with making textures for the circular floor piece. 

Progress

My next assignments are to finish the circular piece and then move on to the uplifted floor piece. After I'll be texturing the archway. Until next time! 


Week 3 (Oct. 28)

This week I worked on modeling, UV-ing, and texturing a tree asset. This tree asset will be in two of the rooms in our scene, the greenhouse/nature room (the first room) and the statue + key room. The pictures I referenced for the tree are the two below: 


Modeling the tree was fairly easier than I expected because our team found a really good tutorial on Youtube. I UV-ed it with the 3D cut and sew tool and moved on to texturing when I got both the model and the UV approved with the modelers. 


I ran into some problems between the UV to the texturing phase. The first being the weird shading I had when I imported the model into Substance Painter. Then the second problem being the tree model breaking when I tried to fix the UVs in Maya. 


Thankfully Tony helped me out with a tip on the UV via adding an edge loop around the bottom to fix the shading a bit and to fix some of the UVs. I also learned that the model-breaking problem could be fixed by exporting the model to another scene. The reason why it broke is still elusive but some of the theories we came up with include: the size scaling of the scene from centimeters to meters might have caused a break somewhere or the curves did not react properly with the main model (since exporting the model didn't include the curves, it worked in a new scene). 

Now that the modeling issue is mainly fixed, I moved onto texturing the tree. From the reference pictures, the model's textures seemed pretty basic; wood material with some height maps for the lines. I did basically that but used two base wood materials, one for a lighter shade and one for a darker shade. Then I had two dirt materials, one using a grunge map and the other a generator. For details, I added bumps or mud spots near the stump and the roots of the tree. I also tried to add moss with color and height detail, but I noticed it looked a bit off so I turned the opacity for that down just so it shows as subtle detail rather than green bumps on a yellow-ish tree. 


The three cards I was assigned to and finished for this sprint were: "As a player, I would like a tree base model so that the room may have life in it.", "As a player, I would like UVs for the tree.", and "As a player, I would like a tree textured like the reference images." For the next sprint, I am most likely going to focus more on texturing assets as my team members start finishing up their models and UVs. Until then!


Week 1-2 (Oct. 20)

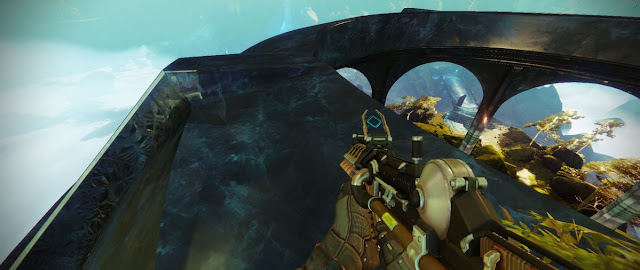
Our final project is to get into teams of 4-5 and developed a game scene from a selected list of games. Our team decided to work on a scene inspired by the game Destiny 2. We concluded that we would make a lost sector type of game scene with the objective of finding a key and opening a treasure chest. The major theme of this level is a crystallized cave with small pieces of nature tucked within it. Below are reference screenshots that were taken by our lead Matthew: 

Reference: Greenhouse/Nature room

Reference: Final treasure room

Reference: Entrance/Hallway

So far our asset list is comprised of: 
  • Broken and Non-Broken Archway 
  • Special Circle-like Archway
  • Baryon Bough Tree(s)
  • Circular Floor piece
  • Crystals 
    • Crystal Mound
    • Giant Centerpiece Crystal
    • Crystal Walls
    • Ceiling Support Crystal
  • Lost Sector Chest
  • Small props
    • Lanterns, Scrolls, Different Types of Pottery, Chalice
  • Obelisk
  • Statue (human-sized)
  • Uplifted Floor Piece
  • Well

Some of the assets and the references 

These assets were chosen to convey our theme of a crystal cave for our lost sector game scene. There's a lot of assets that are crystals and natural elements, specifically trees. We'll also be added a statue and obelisk as well as pottery to hint at civilization, the fact that people have come through here before the player. That is also a good reason why there is a treasure chest here and why the game scene is a "lost sector".
 
For this sprint, our tasks revolved around concepting, gathering references, and setting up Unity's collab. The two major cards, "As a designer, I would like an annotated map so I may identify key points of the scene." and "As a designer, I would like a blocked out Unity scene to gauge the scope of the project." were assigned to everyone on the team because we all worked together to come up with our concept. The only individual cards assigned this sprint went to Matthew (to set up the backlog and create the asset list) and William (to set up Unity). 

Short first sprint

Matthew, Austin, and Willam will be the ones on the team with access to Unity's collab. Together they made a blocked out scene in Unity that had the basic layout of our game scene as well as core props and pieces. After I used the screenshot they took of the topdown view of the block-out and annotated it in Photoshop. 

Annotated Map

From here on out, we'll be going into modeling, texturing, and setting up the scene in Unity. Specifically for the next sprint, we'll be focusing on modeling out the major assets of the first room which is nature-themed. I'm excited to see what we'll come up with and how this final project will go! Ciao for now.

Sunday, October 11, 2020

Tower Micro Scene

CAGD373 Tower Micro Scene

The tower micro scene is an assignment that introduces the LOD feature that both Maya and Unity has. LOD stands for "level of detail" and to put it simply, it's a tool for effectively managing polys in a scene so it's not taxing for the software and hardware to run it. The camera and different versions of an asset model are the key components of LOD. When the camera is zoomed into an asset, the high poly asset will be displayed but when the camera is zoomed out, the lower poly version will be displayed. This way the renderer won't need to render a high poly model when the camera is focused or zoomed into that model and instead it just needs to render a simpler and low poly model. This is effective for reducing render time, scene storage management, and power needed to render. 

My model

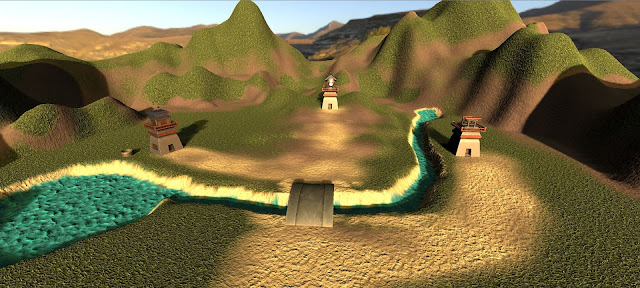
For this assignment, we needed to create a tower base with three different top pieces. I decided to create a more oriental-themed model. My three towers are the flag tower, the bell/gong tower, and a shrine tower. They all have the same base but different toppers. I chose this theme because I don't see many oriental tower-defense types of games or many oriental games in general. So it was a bit challenging finding a base that could be reused because a lot of ancient Asian towers are very distinctive and don't have a foundation for a topper (eg. pagodas). Instead, I went for a basic, commonly-seen that is used in both Japanese and Chinese culture. It's a stone foundation that has a trapezoid shape with the bottom being larger than the top. 


They usually do not have doors or windows but stairs or tunnels going up or through the tower. For mine, I decided to add windows and the door as details and increase the poly count, it also is a way to get up to the tower's top piece however there isn't really a door or opening to the top (which I later realize when I was texturing...).

"light a lantern" by Feng Shanlin

The colors and the look of the towers really come from this piece of art called "light a lantern" by Feng Shanlin on Artstation. Since I felt a night environment might be hard to work with when we are using Baked Lighting and just exporting a Base Color, I decided to move the lighting for my piece to sunset. 

Layers for High Poly Model

Problems Encountered

I didn't have any big problems during this assignment thankfully. Substance Painter did crash a few times when I was working on the prop textures and the Baked Lighting filter but it seemed inevitable that some program (Maya, Substance, Unity, etc) has to crash at least once every assignment... Other than that, some issues that weren't resolved are the UV/texture maps bleeding into each other or not picking up color despite painting or poly-filling it. I had to create another .ssp because the UVs were messed up the first time. 

Texture not completed painted on + Weird normal/height detail

The new .spp doesn't have this issue as much but the textures still do not paint on properly and strangely bleeds through. However, this isn't too big of an issue because it is hidden by the asset piece in front of it and I now realize the cause of this problem might be due to the fact I didn't combine the individual pieces together before exporting to Substance Painter, making some pieces act like floaters. 

3 textures bleeding onto 1 UV 

Final Look

Texture Maps


Overall, I think they turned out well and are distinctive from each other, topper-wise. The terrain turned out better than I expected despite the water seeming a bit wonky since it's painted on the terrain and isn't a physics-based material or anything fancy. I also added a particle effect for the shrine topper since it felt a bit empty without anything in the center. 

Thursday, October 8, 2020

Parasitic Sprint 3 Blog Post

Parasitic Level Design Post#3

For our third sprint, I focused on finishing the one big card from Sprint 2 about populating my level with assets and the two Sprint 3 cards I was assigned to, and those cards are: 
  • "As a level designer, I need to create clear boundaries for the player to restrict going off path."
  • "As a level designer, I need to set up the lighting of the level so the atmosphere of the level matches the theme."
This sprint was really about further "fleshing out the level" and waiting for enemies and other assets to be done so we could add them to our level. The first card of this sprint and technically, the card I was already working on since the last sprint was "As a level designer, I need to populate my level with current assets to get the tone of the level established." I worked on this card and the "As a level designer, I need to create clear boundaries for the player to restrict going off path" card at the same time because they coincided. I needed a terrain to visually layout the story and pathing of the level and I needed assets to get a feel of where the terrain elevates and comes in and out of the level. My first version was okay but from the feedback I got, the level would look much better with more color and shading, some height added to the level so that the level isn't completely flat, and assets spread out into the terrain and not just the area where the player moves in. 

Version 1

I did not really have any problems with adding assets in the level itself and populating the level. Adding height to the level itself was sort of a problem, however. Because the terrain would be decimated in blender so it would be low-poly, adding height within the level area (blue grid) would cause the terrain/ground to be uneven. There was a height difference, meaning some areas of the level were higher than others and this was sort of noticeable in-game because in those areas the map's grid would go into the terrain and come out. This would have been okay if it was at least around the small elevation pieces added into the area but it was in large portions of the level. While the elevation isn't tall, at most it's a 0 to 0.2 difference on the y-axis, the player movement does not detect elevation so it would be weird to see the player's feet go into the terrain as they move into some areas of the map. 

Terrain not flat, some areas slightly goes above the map grid 

The solution I had for this problem was done in two parts. First, in blender, I used a very low ratio of the decimate tool so the poly level was flattened as much as possible, and then I resculpted the terrain using blender's modeling tools to flatten it further by smoothening the vertices, this also meant the height added into the level would be shortened considerably. The picture below shows that the mounds with the mountains are much smaller and shorter.

Solution in blender

Then finally, in Unity, I moved the terrain down by -0.08 on the y-axis so most of the elevation would be below the map grid and I used the assets to hide the grid lines that go into any uneven terrain. This meant shifting a lot of assets around and adding more unmovable tiles into my level. Regardless since the camera is from a slight top-down perspective the slight de-elevation of the terrain from the map grid might not even be too noticeable. In the end, I feel like my level is a lot more natural with the height added and a rework of the level's assets. I'm proud of what it came to be and it feels like my hard work paid off. 

Most current version

With this, both the "As a level designer, I need to populate my level with current assets to get the tone of the level established." card and the "As a level designer, I need to create clear boundaries for the player to restrict going off path" card are verified and completed. My remaining cards are "As a level designer, I need to set up the lighting of the level so the atmosphere of the level matches the theme." and "As a level designer, I need to playtest my level to check for discrepancies so the level flows smoothly." I'm currently in-progress with the card about lighting and the latter card is more of a continuous card that goes beyond just 1 sprint. So overall, I feel like I got a lot done this sprint. And now that all our levels are moved into the main Unity project, we'll be able to add assets as they are added into the project and keep up with the rest of the team. I can't wait to fully furnish my level with enemies and player characters so that the level is playable and has clear objectives. Until the next one, cheers!


Wednesday, September 23, 2020

Parasitic Sprint 2 Blog Post

Parasitic Level Design Post#2

The second sprint was focused on transitioning from conception to proofing, meaning we would be moving from designing to implementation. The cards assigned to me this sprint are: 

  • "As a level designer, I need to make an asset list full of possible assets needed to fill my level with purpose and theme for the shrubbery-filled meadow level."
  • "As a level designer, I need to annotate an open-spaced basic introductory level that puts my newly found skills to work in a stress free environment." 
  • "As a level designer, I need to block out an open-spaced basic introductory level that puts my newly found skills to work in a stress free environment"
  • "As a level designer, I need to populate my level with current assets to get the tone of the level established."
There was also the "As a level designer, I need to create a testing ground where we can test the most up to date mechanics" from Sprint 1 that was assigned but wasn't moved. Luckily, we finished it pretty early on for this sprint since this card just entails the Unity collab we would need to set up to implement and test our levels with.

The first Sprint 2 card I work on was the asset list card. I decided to do this first so I would know what assets I'll need in my level. This would also help me annotate my level's map since I'd know what all the core assets would be. There weren't any problems with this card, but there was a bit of feedback about one asset, which is the elevation/terrain asset; instead of requesting this as an asset, it would be better to use the terrain editor in Unity to make elevation instead. 

The next card I worked on was the annotated map. We had been working on several versions of a map for our levels since the last sprint so for this sprint, it was time to fully polish up an annotated map and use it as a building guide for when blocking out our levels. I did encounter some problems with this card, mostly due to the size of the map in that it might be too big and how the level should play out.


The problem with this map was that it was still too large and that there shouldn't be multiple exits. After taking this into consideration, I went back into Photoshop to resize the grid and repaint the paths. 


This is the final approved version of my map. And the next step would be blocking it out in Unity.

Blocking took a while and this is because of 1) the size of my map and 2) I would need to check off the unmovable spaces individually. I had to go at a slower pace to avoid eye strain since I would need constantly to zoom in and out while also looking back and forth between the Unity scene and annotated map. 


After this was done, I could move on to actually blocking out the scene. And similarly, it took a while too since this wasn't just a choice between green and red dots but adding in different primitives as a way to keep track of what would be a tree and what was a rock. Luckily, I only needed to add six different kinds: cylinders for trees, squares for rocks, squashed cylinders for crates and barrels, spheres for buff spots, tilted squares for treasure, and of course, a capsule for the player. 


Midway through this card, there was still time left in the sprint so we were also assigned the asset implementation card. However, I didn't get to finish this card before Sprint 2 ended so this is the card I have in progress for now and for the beginning of Sprint 3. I have the level mostly populated, the only thing left is terrain building and pathing. 


For Sprint 3, I'll be finishing up the terrain and finally playtesting the level. I'm pretty satisified with the current state of my level and can't wait to see how everyone else's levels turn out. Cheers!


Tuesday, September 1, 2020

Parasitic Sprint 1 Blog Post

Parasitic Level Design Post#1

The first sprints are usually, always focused on building the foundations of the game. As a level designer that would mean research, concept-ing, and collaborating with the team. The cards assigned to me or rather our fraction of level designers are: 

  • "As a member of Parasitic Studios, I need a Unity account" 
  • "As a level designer, I need to create a testing ground where we can test the most up to date mechanics" 
  • "As a level designer, I need to research and annotate grid-based levels similar to that of XCOM 2" 


The cards that are completed are "As a member of Parasitic Studios, I need a Unity account" and "As a level designer, I need to research and annotate grid-based levels similar to that of XCOM 2". The first being the easiest since a Unity account is required in most CAGD classes. The next one was heavily concept-ing and researched. Collaboration was also a big part of this card as our level designers discussed and shared examples and guides of what strategy levels should feel like, how the grid-based levels would look like, and why certain concept levels work and others do not.


The one card that is still "In Progress" is the "As a level designer, I need to create a testing ground where we can test the most up to date mechanics". This card relied on components from other cards such as a collaborative Unity file where we could set up a testing ground and the grid-based systems and other scripts that our programmers were working on. Thus for this sprint, we focused more on concept-ing and making concept, grid maps of our level. 


Problems Encountered: 

There weren't any big problems aside from being blocked from working on the testing grounds. Problems in this sprint were mainly from developing my level's concept map. My first map was obviously a bit small and very linear. It was a basic block out of the level's terrain and it didn't include any of the enemies or any clear indication where the player would start. 


So to fix these issues my next map was more colorized and larger. This concept piece showed a larger level with more terrain and the enemies/player placements. However, the problem with this level is that it's not a grid, the shapes are hexagons and not squares. The level itself is still too linear and for a level that should that 20 minutes or so to complete this concept still falls short. 


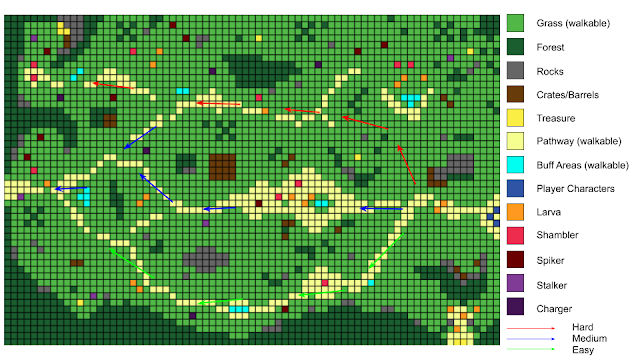
The third concept map I made used pixels instead of hexagons. It's also considerably longer and larger. There are many more enemies and it's definitely less linear. The level starts on one path but splits into three different routes before leading the player into a larger field for a all-out brawl. But the downside of this level is that it's too large and there are way too many enemies, especially that last area which would overwhelm the player too much. Another concern was the fact that the design document described the first level as an open meadow and my map was more like a closed forest. 


My most recent map and final one of this sprint is designed to be more open and meadow-like. The path (yellow-ish) tiles show the player the intended routes but the openness of the level encourages exploration. There are fewer enemies and the length of the level looks good enough to last 20 or so minutes. The only problem with this level would be that it's not fleshed out enough and rather messy. I hope to fully realize this level when we get our testing ground set up and start building the level in Unity so I can test the level for accuracy of length and challenge.